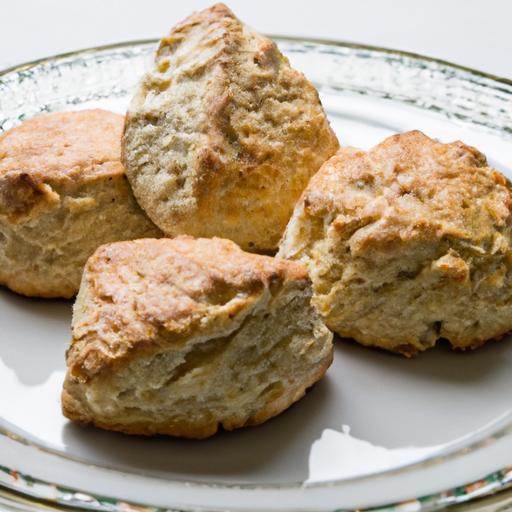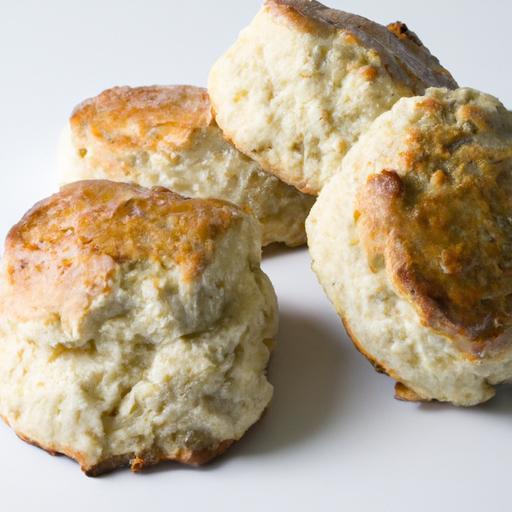
There’s something undeniably comforting about a freshly baked scone-it’s golden crust giving way to a tender, fluffy interior that’s just begging to be savored. But for those navigating the world of gluten-free baking, achieving that perfect balance of fluffiness and flavor can feel like an elusive art. Enter “Fluffy & Flavorful: The Ultimate Guide to Gluten-Free Scones,” your passport to mastering these delightful treats without compromise. Whether you’re new to gluten-free baking or a seasoned pro seeking new tips and tricks, this guide will unravel the science, share foolproof recipes, and inspire your creativity-all to help you bake scones that are as light as a feather and as rich in taste as their customary counterparts. Get ready to transform your kitchen into a haven of irresistible, gluten-free goodness.
Fluffy & Flavorful gluten-free scones are more then just a delightful breakfast treat-they embody the perfect harmony of moisture, texture, and taste that many believe to be elusive without traditional wheat flour. Drawing inspiration from classic British teatime traditions, these scones prove that gluten-free baking can be just as tender and fluffy as the original, if not better. Personally, I discovered this recipe after countless trials, mastering the art of balancing moisture and incorporating the right flours and flavor boosters to conquer common gluten-free challenges.
Prep and Cook time
- Preparation: 15 minutes
- Resting time: 30 minutes (optional but recommended)
- Baking: 18-20 minutes
- Total Time: 45-50 minutes
yield
Yields 8 medium-sized scones
Difficulty Level
Easy to Medium – Perfect for bakers of all levels seeking to master gluten-free treats
Ingredients
- 2 cups gluten-free flour blend (a blend containing rice flour, tapioca starch, and potato starch recommended)
- 1/4 cup almond flour (for tenderness and moisture)
- 1/4 cup granulated sugar
- 1 tbsp baking powder (ensure gluten-free)
- 1/2 tsp xanthan gum (to improve structure and elasticity)
- 1/4 tsp salt
- 1/2 cup cold unsalted butter, cubed
- 2 large eggs
- 2/3 cup whole milk (or dairy-free choice)
- 1 tsp pure vanilla extract
- Zest of 1 lemon (optional for bright flavor)
- 1/2 cup dried blueberries or currants (optional, for a burst of fruity sweetness)
Instructions
- Preheat your oven to 400°F (200°C). line a baking sheet with parchment paper or a silicone baking mat for effortless cleanup and even baking.
- Mix dry ingredients: In a large bowl,sift together the gluten-free flour blend,almond flour,sugar,baking powder,xanthan gum,and salt. This ensures an even distribution of leavening agents and prevents clumping.
- Cut in the butter: Add the cold cubed butter and use a pastry cutter or your fingers to work it into the flour mixture. Stop once it resembles coarse crumbs, with pea-sized pieces of butter still visible. The cold butter chunks create steam pockets during baking-the key to that flaky, tender texture.
- Combine wet ingredients: In a separate bowl, whisk together the eggs, milk, and vanilla extract untill smooth. If using lemon zest, stir it in now to infuse a subtle citrus aroma throughout the dough.
- Bring it all together: Make a well in the centre of your dry ingredients and pour in the wet mixture. Gently fold everything together with a wooden spoon or spatula just until combined. Do not overmix; the dough should be slightly sticky but hold together. Fold in dried blueberries or currants now for added bursts of flavor.
- Shape and chill: Turn the dough onto a lightly floured (gluten-free flour) surface.Gently pat it into a circle about 1-inch thick. For best results, refrigerate the dough for 20-30 minutes. This resting time improves gluten-free flour hydration and helps retain shape during baking.
- Cut and bake: Using a sharp biscuit cutter,cut out 8 evenly sized scones. Transfer to your prepared baking sheet, spacing them about 2 inches apart. Brush the tops lightly with milk or an egg wash to promote golden color and shine.
- Bake: Slide the tray into the oven and bake for 18-20 minutes, or until the scones rise, turn golden brown, and a toothpick inserted into the center pulls out clean. Avoid opening the oven frequently to prevent heat loss.
- Cool and serve: Allow scones to cool on a wire rack for 10 minutes before serving. This short rest lets the crumb set to achieve that ideal light and tender bite.
Tips for Success
- Choosing flours: Combining a gluten-free flour blend with almond flour balances moisture and adds tenderness. Avoid 100% rice flour, which can create a gritty texture.
- Moisture balance: The egg and fat content play crucial roles in moist scones-don’t skimp on butter,and always use fresh eggs for the best lift.
- Flavor boosters: Acidic zest like lemon or orange brightens the flavor,while dried or fresh soft fruit adds texture and natural sweetness.
- Don’t overwork: Minimal handling preserves the delicate crumb structure essential to fluffy scones.
- Make ahead: Freeze baked scones wrapped well for up to one month; gently reheat in the oven to restore freshness.
Serving Suggestions
Serve warm scones fresh from the oven, split open and slathered with creamy clotted cream and your favorite jam-classic strawberry or tangy raspberry work beautifully. For a modern twist, add a drizzle of honey and toasted nuts or a dollop of whipped coconut cream for dairy-free elegance. Garnish with a sprinkle of powdered sugar or lemon zest for a visually stunning presentation that complements the delicate crumb.

| Nutrient | Per Scone |
|---|---|
| Calories | 190 |
| Protein | 4g |
| Carbohydrates | 24g |
| Fat | 9g |
For more creative gluten-free baking inspiration, explore our Gluten-Free Breakfast Ideas or refer to The Celiac Disease Foundation’s guide for expert advice on gluten-free nutrition.
Q&A
Q&A: Fluffy & Flavorful – the Ultimate Guide to Gluten-Free Scones
Q1: Why do gluten-free scones frequently enough turn out dense or crumbly?
A: Gluten gives traditional scones their signature structure and elasticity. Without it, achieving that delicate balance of fluffiness and tenderness can be tricky. The key is using the right combination of gluten-free flours and binding agents-like xanthan gum or psyllium husk-plus gentle handling of the dough to avoid overworking it.
Q2: What gluten-free flours work best for making scones?
A: A blend is your best friend here. Almond flour adds moisture and richness, while rice flour or sorghum flour provides a mild, neutral base. Tapioca or potato starch can boost the lightness. Experiment with ratios, but many bakers find success with a mix that’s about 40% nut flour, 40% grain flour, and 20% starch.
Q3: Can I use regular baking powder in gluten-free scones?
A: Absolutely! Baking powder doesn’t contain gluten, so it’s perfectly safe for gluten-free baking. Just make sure your baking powder is fresh for optimal rise. Some brands add cornstarch; if you have corn sensitivities, look for a corn-free alternative.
Q4: How do I keep gluten-free scones moist without making them heavy?
A: Moisture is the magic ingredient. Consider adding sour cream, yogurt, or a bit of buttermilk for tenderness. Don’t skimp on fat-like butter or coconut oil-as it contributes flavor and softness. Lastly, baking just until golden prevents dryness.
Q5: what are some flavorful mix-in ideas to elevate gluten-free scones?
A: The world is your oyster! Classic mix-ins like fresh blueberries, dried cranberries, or chocolate chips work beautifully. For a twist, try lemon zest and poppy seeds, chopped nuts with cinnamon, or even savory herbs and cheese for a different vibe.
Q6: Should gluten-free scone dough be chilled?
A: Yes! Chilling the dough firms up the fats and helps the scones hold their shape during baking.It also allows flavors to meld nicely. Aim for at least 30 minutes in the fridge before cutting or shaping.
Q7: How can I tell when gluten-free scones are perfectly baked?
A: Look for a lightly golden top and firm edges, but still tender inside. A toothpick inserted should come out clean or with just a few moist crumbs, not wet batter. Remember, gluten-free baked goods can brown a little differently, so trust your senses.
Q8: Can these scones be made vegan as well as gluten-free?
A: Definitely! Swap out butter for plant-based alternatives like coconut oil or vegan margarine, and replace eggs with flax eggs or applesauce. Using vegan yogurt or non-dairy milk will keep scones moist and fluffy without compromising flavor.
Q9: How should I store gluten-free scones to keep them fresh?
A: Store cooled scones in an airtight container at room temperature for up to two days. For longer storage, freeze them individually wrapped; reheat gently in the oven to regain that fresh-from-the-oven charm.Q10: Any final tips to master fluffy and flavorful gluten-free scones?
A: Patience and practise are gold! Measuring ingredients precisely, mixing just until combined, and experimenting with flour blends will guide you to perfection. Embrace the delightful quirks of gluten-free baking, and don’t be afraid to customize flavors to your heart’s content. Happy baking!
Closing Remarks
Whether you’re a seasoned gluten-free baker or just beginning to explore the joys of wheat-free treats, mastering the art of fluffy and flavorful scones is a delightful journey well worth taking. With the right ingredients,techniques,and a dash of patience,these tender little pastries can become your new go-to comfort food-each bite bursting with wholesome goodness and satisfying texture. So next time you crave a cozy teatime companion or a breakfast that feels like a warm hug, remember that gluten-free scones are not just possible-they can be utterly irresistible. Happy baking, and may your kitchen always be filled with fragrant, golden batches of scone perfection!